Friday, March 6, 2015
FLATTEN
So after I was able to import the object data from some shp files, I soon found out that I just couldn't copy the txt to different drawing. What I found was that the flatten command does wonders with all this object data text.
Plain Text from Object Data
This works sweet to extract plain old txt from object data.
I found the super helpful article here. http://map3d.wordpress.com/I take no credit for the information that I am going to copy to my blog so that I can find it in the future.
Have you ever imported ESRI SHP files or other GIS files and need to create some simple text labels for that data? Do you have some object data attached to entities that you now need to display that data in the drawing? One method of displaying or labeling those entities is by using Map Annotation Blocks or use FDO. But what if you need something quick and as plain text?
I see questions on how to do this or can Map3D do this. Yes it can be done. You can use the Map3D display manager to query the current drawing then create a “Map3D” text style in the display manager.
So lets look at the drawing I have for the example.
It’s a simple parcel map imported from an SHP file and object data was created on the import. What I need is to label each parcel from that object data with the Watershed1 value.
The first step is opening the Map3D Task Pane and using the Display Manager tab. If the task pane is not open use the command MAPWSPACE and select ON at the command line.
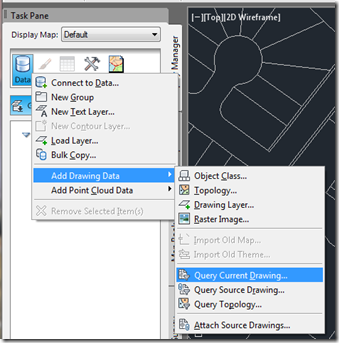
Now click on the Data icon in the display manager, scroll down to “Add Drawing Data” then select “Query Current Drawing”
The Define Query dialog will open allowing you to define the query. I want to query on my object data so I select “Data” for the query type. The Data Condition dialog will open allowing me to select the data to query on. I select “Object Data” make sure I have the correct Table listed (Parcels), select the field I want the label to display (Watershed1) then for the Operator and Value I use = (equal sign) and *(the wildcard expression).
As soon as I click OK it populates the upper part of the Define Query dialog. Clicking OK in this dialog takes me back to my drawing.
I now have a new object or a Map3D Display Manager Layer listed in the Task Pane.
The next step is to add a text style to display the text that is being queried in on that new layer. TIP: When we say Layer in Map3D Display Manager it is NOT an AutoCAD layer and has no relationship to the layer manager or any of the AutoCAD layers.
To create our text style for our data labels we right click on the layer name in the Display Manager and select “Add Style” then “Text”.
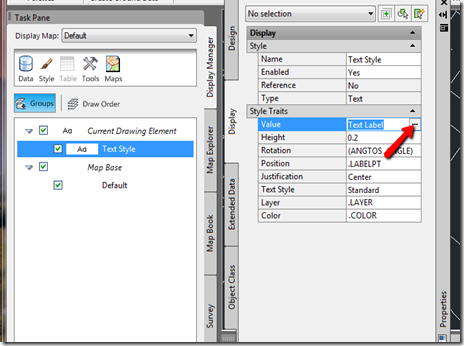
We now have another object in the Display Manager under the “Current Drawing Element” layer named “Text Style”. Highlight the “Text Style” in the Display Manager and look at the properties of it in the property palette. (Right Click and select Properties to open the property palette.) This is where we tell it to display the values from the Object Data table.
Select the Value- Text Label to show the ellipsis icon (the 3 dots) Click on the icon to open the Expression Chooser.
In the Expression Chooser, expand the tree to get to the Object Data field to label from. Select the field and click OK.
Back it the Property Palette set the Height as needed and any other property you wish. Notice I changed the Height to 10 and provided a better fitting name for the text style.
Notice as you start to make changes in the property palette for the Text Style the labels change instantly allowing you to see the changes as you make them.
Now back in the drawing we have labels for all of the parcels and they are plain AutoCAD text objects. No FDO text style, no Civil3D label and no Map Annotation blocks.
Subscribe to:
Comments (Atom)


