Friday, September 18, 2015

parcel table expression

So I keep having this reoccurring issue, on how to get my R/W TOTAL ACRES column in the WisDOT "SCHEDULE OF LANDS & INTERESTS REQUIRED " table
 to read in acres, it defaults to sq.ft.


Click Expressions to highlight

Right click on Total RW


{Parcel Area}/43560 + {Existing RW}

Friday, March 6, 2015

FLATTEN

So after I was able to import the object data from some shp files, I soon found out that I just couldn't copy the txt to different drawing.  What I found was that the flatten command does wonders with all this object data text.

Plain Text from Object Data

This works sweet to extract plain old txt from object data.

I found the super helpful article here.  http://map3d.wordpress.com/

I take no credit for the information that I am going to copy to my blog so that I can find it in the future.

Have you ever imported ESRI SHP files or other GIS files and need to create some simple text labels for that data? Do you have some object data attached to entities that you now need to display that data in the drawing? One method of displaying or labeling those entities is by using Map Annotation Blocks or use FDO. But what if you need something quick and as plain text?
I see questions on how to do this or can Map3D do this. Yes it can be done. You can use the Map3D display manager to query the current drawing then create a “Map3D” text style in the display manager.  
So lets look at the drawing I have for the example.
OD_Info
It’s a simple parcel map imported from an SHP file and object data was created on the import. What I need is to label each parcel  from that object data with the Watershed1 value.
The first step is opening the Map3D Task Pane and using the Display Manager tab. If the task pane is not open use the command MAPWSPACE and select ON at the command line.
Add_Layer
Now click on the Data icon in the display manager, scroll down to “Add Drawing Data”  then select “Query Current Drawing”
The Define Query dialog will open allowing you to define the query. I want to query on my object data so I select “Data” for the query type. The Data Condition dialog will open allowing me to select the data to query on. I select “Object Data” make sure I have the correct Table listed (Parcels), select the field I want the label to display (Watershed1) then for the Operator and Value I use = (equal sign) and *(the wildcard expression).
query
As soon as I click OK it populates the upper part of the Define Query dialog. Clicking OK in this dialog takes me back to my drawing.
I now have a new object or a Map3D Display Manager Layer listed in the Task Pane.
new_Layer
The next step is to add  a text style to display the text that is being queried in on that new layer. TIP: When we say Layer in Map3D Display Manager it is NOT an AutoCAD layer and has no relationship to the layer manager or any of the AutoCAD layers.
To create our text style for our data labels we right click on the layer name in the Display Manager and select “Add Style” then “Text”.
Add_TextStyle
We now have another object in the Display Manager under the “Current Drawing Element” layer named “Text Style”.  Highlight the “Text Style” in the Display Manager and look at the properties of it in the property palette. (Right Click and select Properties to open the property palette.)  This is where we tell it to display the values from the Object Data table.
Select the Value- Text Label to show the ellipsis icon (the 3 dots) Click on the icon to open the Expression Chooser. 
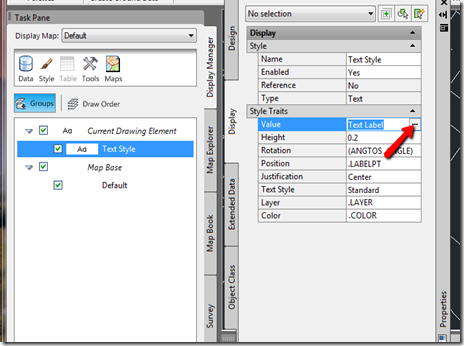
TextStyle_default
In the Expression Chooser, expand the tree to get to the Object Data field to label from. Select the field and click OK.
expression 
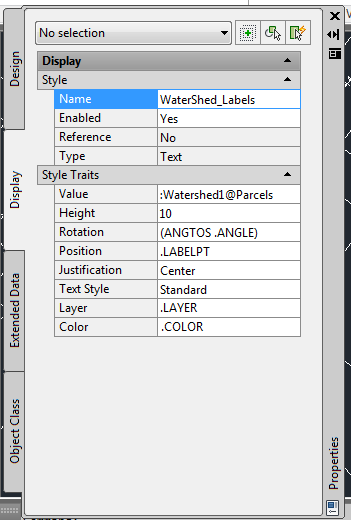
Back it the Property Palette set the Height as needed and any other property you wish. Notice I changed the Height to 10 and provided a better fitting name for the text style.
Text_Final
Notice as you start to make changes in the property palette for the Text Style the labels change instantly allowing you to see the changes as you make them.
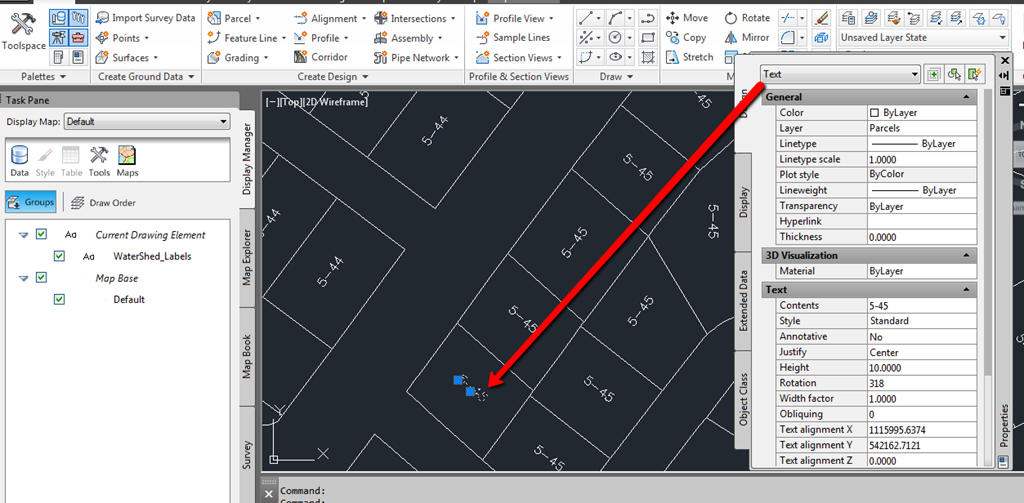
Labed_Drawing
Now back in the drawing we have labels for all of the parcels and they are plain AutoCAD text objects. No FDO text style, no Civil3D label and no Map Annotation blocks.

Monday, August 4, 2014

THOSE DAMN ATTRIBUTES!!!

For those occasional times when you would like to automatically import OD

I found this nugget of info that I have now used many times.  Thanks you source!

First, use 'Mapimport' to bring in your closed polylines with object data.

then:
1- 'mapanntemplate'  (don't enter the quotes - you'll get a dialog box, when you hit ok, it'll open the block editor)
2- 'mapanntext' (then I hit 'enter' for new text.  You'll get a dialog box asking for information for you to supply for the label.  Under the 'value' box, you can specify a field from your object data to be supplied.  When it asks for the insertion, i always use 0,0; which inserts the text right where i need it inside the polylines.).  At that point, i close the block editor, saving my changes on the way.
3 - 'mapanninsert' (check the template you created, select your polylines, and voila!  Labels!

if the labels need to be tweaked, use the 'mapanntemplate' again, to edit the template contents, such as size, layer, etc.; then run the 'mapannupdate' command to have those changes reflected.

Tuesday, December 11, 2012

Translating ortho images

Here is a quick and easy solution to a problem I encounter every time I need to insert an orthographic file that is based on a differing coordinate system.

Here is a link to the article from Master Graphics.  Thank You Master Graphics!!!

In the event that this page is removed the key commands are.

If you are in the same coordinate system and units this should work.

1.  MAPIINSERT
Note: the Map Image Insert command will NOT transform the coordinates or units of an image if they
differ from the drawing coordinate system or units. Be aware of the difference between US feet and
International feet.

If you have differing units or coordinate systems, you will need to follow a few steps.

  1. Start a new drawing with the same units and system as the image file you are trying to utilize.
  2. Use MAPIINSERT to insert the raster image into the new drawing you just created with matching values.  save and  close this drawing.
  3. Go back to your project drawing and verify that the drawing units that you are working in are established in Civil 3D
  4. Type  MAPWSPACE  on the home tab clich attach source drawing, you will need to establish a drive alias (a path to the location of your image file) the alias name can be anything you call it but you will need to browse the file location of the image file. Add the path and then Close the command 
  5. Now you need to add that information to your drawing.  type adequery  Click location and set boundary to ALL then click OK, next set the query mode to DRAW and click Execute Query.
  6. This should bring you file in ZE and you should see it.  The last step is to DETACH the drawing from the map explored tab ( WMAPSPACE )


I will also include some sweet data sources for Wisconsin.

Wisconsin View follow the link to Imagery Downloads.  You will need to sign up and or sign in with your email address.  From my experience all the files are in wtm or wisconsin transverse mercator.

 Wisconsin Historic Aerial Image Finder allows you to search aerial photographs of Wisconsin from 1937-41.  Here there is no real correlation with the images, you are on your own.


Wednesday, November 28, 2012

OD

I found this helpful when trying to annotate some blocks with OD

Here is the link  

1- 'mapanntemplate'  (don't enter the quotes - you'll get a dialog box, when you hit ok, it'll open the block editor)
2- 'mapanntext' (then I hit 'enter' for new text.  You'll get a dialog box asking for infomation for you to supply for the label.  Under the 'value' box, you can specify a field from your object data to be supplied.  When it asks for the insertion, i always use 0,0; which inserts the text right where i need it inside the polylines.).  At that point, i close the block editor, saving my changes on the way.
3 - 'mapanninsert' (check the template you created, select your polylines, and voila!  Labels!

if the labels need to be tweaked, use the 'mapanntemplate' again, to edit the template contents, such as size, layer, etc.; then run the 'mapannupdate' command to have those changes reflected.

Tuesday, July 10, 2012